TL;DR — generated with AI
Want to send and receive email from your custom domain without paying $8–16/month for something like Google Workspace? Use AWS SES for outbound mail (~$0.10 per 1,000 emails), Cloudflare Email Routing for inbound forwarding (free), and tie it all together through your existing Gmail account. The setup takes about an hour and costs practically nothing for low-volume personal use.
Trade-off: each custom address you want to send from requires manual configuration in Gmail as an alias. Fine for one or two addresses, tedious if you need a dozen. You’ll also need your domain on Cloudflare and to wait 24 hours for AWS to approve production access.
So you’ve got a custom domain and you want to send and receive email from it. Maybe it’s for a portfolio site, a side project, or just because [email protected] looks more professional than a Gmail address. The easy option is to sign up for yet another subscription with Google Workspace, Fastmail, or Proton Mail, which at the time of writing will set you back somewhere between $8 and $16 AUD per month.
The overengineered option is to self-host your own mail server, but email reputation is a delicate thing. You’ll need a pristine static IP address (an increasingly rare commodity), an excellent email configuration, and 24/7 availability. Running your own mail server in 2026 is a bit like insisting on churning your own butter. Technically possible, occasionally satisfying, mostly not worth the effort.
But for those of us who send fewer than a few dozen emails per month, only need a single user, and are happy with the 15GB of storage that Gmail provides for free, there’s a third option. This guide walks through a pay-as-you-go setup that reuses your existing free Gmail account and enhances it to send and receive email from your custom domain for almost free.
Costs and trade-offs
This setup is targeted at low-volume personal use email. If you are running a business and want multiple employees to receive and send emails using your domain, the paid options are what you are looking for.
Starting with the extra costs, we are looking at spending a few cents per year:
- Cloudflare Email Routing: Free
- Gmail: Free account (this can be
[email protected]) - AWS SES: ~$0.10 USD per 1,000 emails
- Your domain: Whatever you’re already paying for it
Every custom address you want to send from needs to be manually configured as a Gmail alias. If you create hello@, contact@, and invoices@ in Cloudflare, you need to add all three in Gmail’s “Send mail as” settings, each with the same SES SMTP credentials.
Receiving is fine. Cloudflare can forward any number of addresses (or use a catch-all) to your Gmail inbox. But sending requires that one-time setup per address.
For one or two addresses, this is a non-issue. Set them up once and forget about them. For a dozen different outbound addresses, this approach gets tedious. At that point, paying for a proper email service starts to make sense.
The architecture
For this setup to work, your domain must be on Cloudflare so that you can use their Email Routing service (this is free).
Here’s what the end result of our desired workflow looks like:
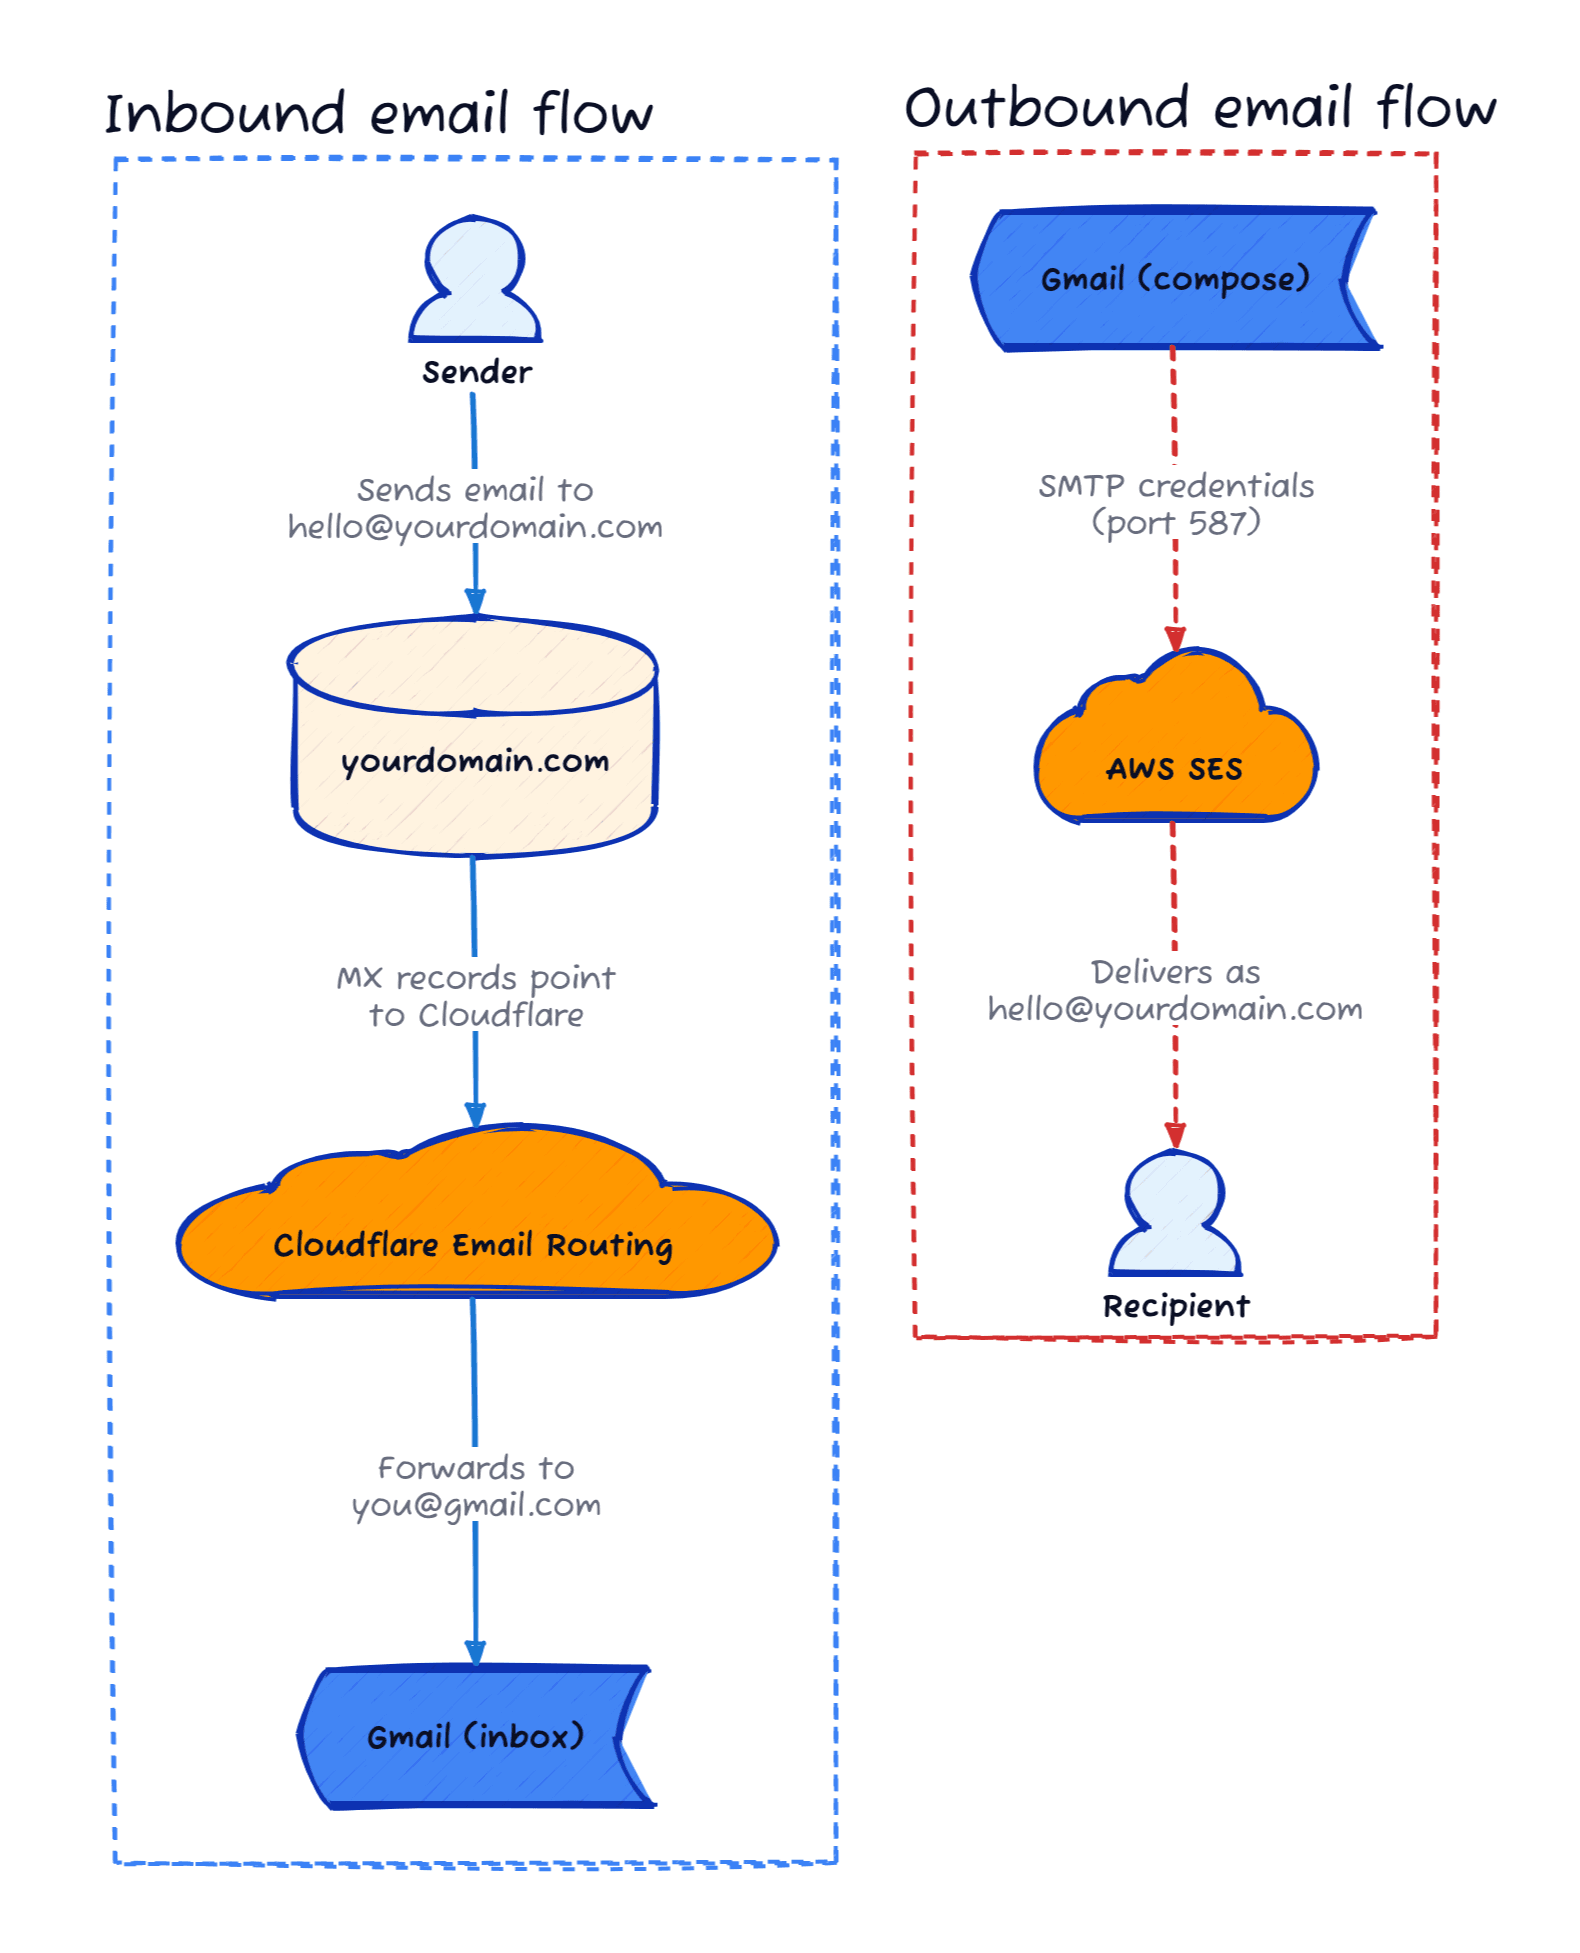

Inbound email flow:
- Someone sends an email to
[email protected](or even*@yourdomain.com) - Cloudflare Email Routing receives it (because your MX records point to Cloudflare)
- Cloudflare forwards it to your personal Gmail address of choice
- You read it in Gmail like any other email
Outbound email flow:
- You compose a reply in Gmail
- Gmail sends it through AWS SES using SMTP credentials
- The recipient sees the email coming from
[email protected]
Two separate systems, stitched together by Gmail.
Let’s jump into the setup!
Part 1: Setting up AWS SES for outbound email
AWS Simple Email Service is Amazon’s email sending platform. Companies use it to send millions of transactional emails, but it works just as well for sending three emails a month from a personal domain. The pricing is pay-per-email, and it’s about $0.10 per 1,000 emails. Practically free for personal use.
First of all, if you haven’t created an AWS account yet, you’ll need to do that before continuing this guide.
Verify your domain
First, prove to AWS that you own the domain you want to send from.
- Open the AWS SES console
- In the left sidebar, click Identities
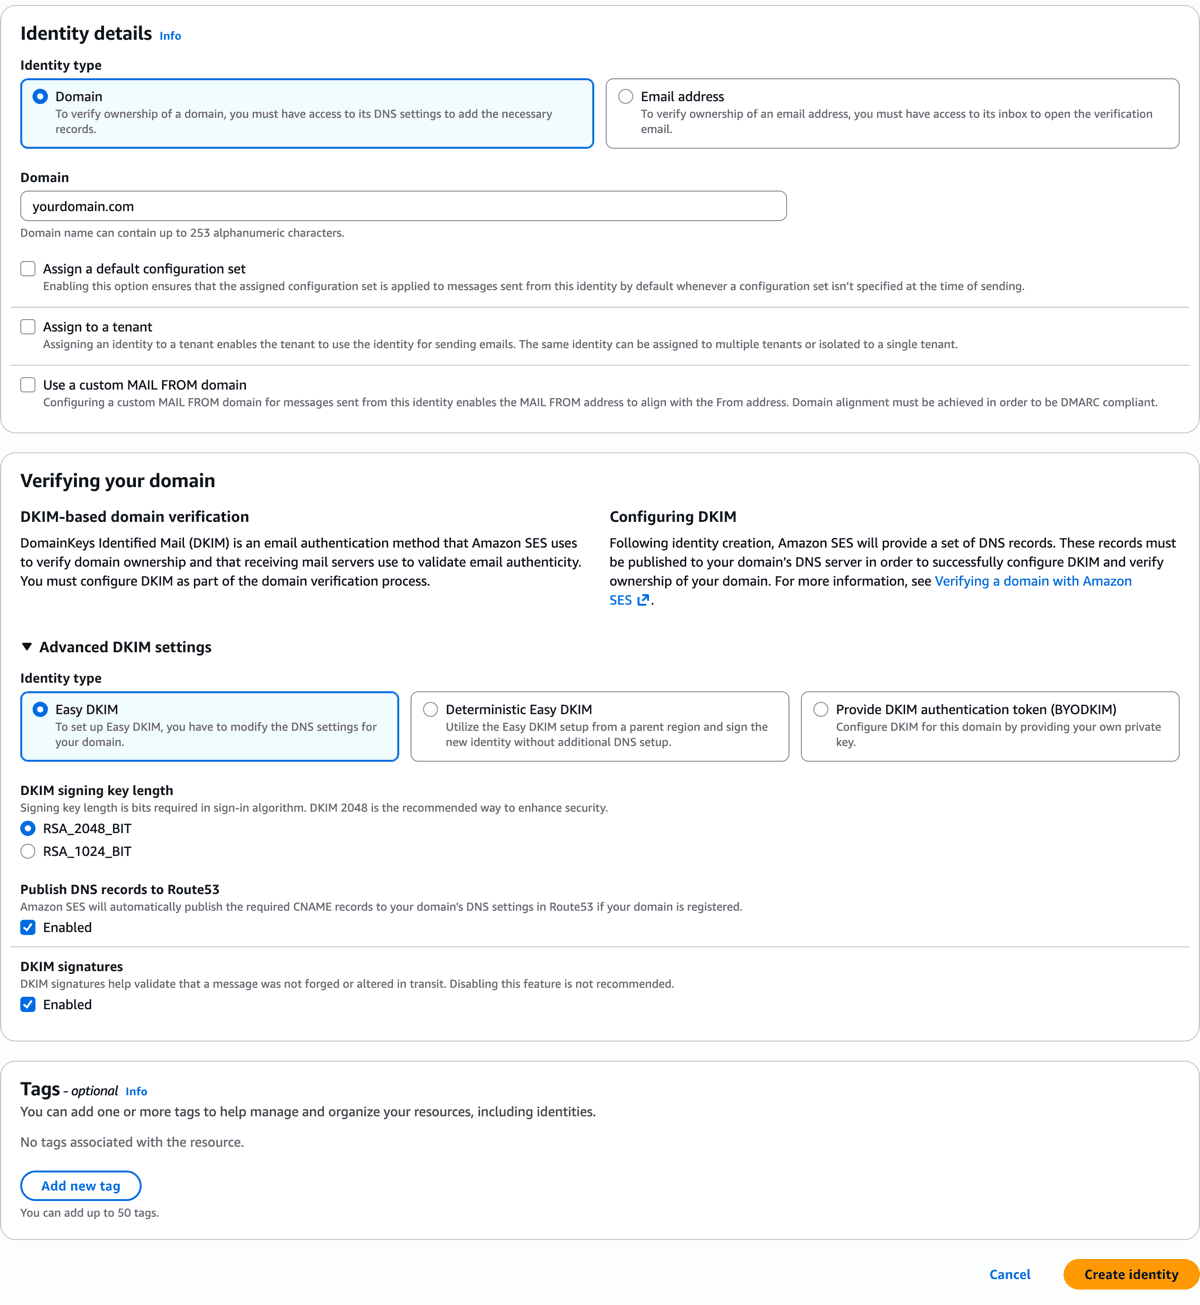
- Click Create identity
- Select Domain and enter your domain name (e.g.,
yourdomain.com) - Under Advancing DKIM settings, choose “Easy DKIM” with 2048-bit RSA
- Click Create identity
AWS will display a set of DNS records to add. You’ll need three CNAME records for DKIM (these prove emails are legitimately from your domain and haven’t been tampered with).

Head over to your DNS provider and add those records. If your domain is already on Cloudflare (which it will be for the next part of this guide), add them there. DNS propagation can take anywhere from a few minutes to a few hours.
Once the records propagate, the identity status in SES will change from “Pending” to “Verified”.
You are now in SES sandbox
By default, new SES accounts are in “sandbox mode”. This means you can only send emails to verified email addresses. You can’t just start blasting emails to anyone. Amazon wants to make sure you’re not a spammer before they let you loose on the internet.
To get production access:
- In the SES console, go to Account dashboard
- You’ll see a banner about sandbox mode. Click Request production access
- Fill out the form:
- Mail type: Choose “Transactional” (personal email counts as transactional)
- Website URL: Your domain or portfolio site
- Use case description: Be honest. Something like: “I want to send and receive email from my personal domain for professional correspondence. Expected volume is under 100 emails per month.”
AWS typically reviews these within 24 hours. I’ve heard of people getting approved in minutes, others waiting a day or two. If you get rejected, they’ll tell you why and you can appeal. The key is to sound like a human with a legitimate use case, not a robot planning to sell delicious supplements.
While you wait, you can still complete the rest of this setup. You just won’t be able to send to external addresses until you’re out of the sandbox.
Create SMTP credentials
Gmail needs credentials to send email through SES. These are different from regular AWS access keys.
- In the SES console, go to SMTP settings in the left sidebar
- Note down the SMTP endpoint for your region (e.g.,
email-smtp.ap-southeast-2.amazonaws.com). Pick the region closest to you. - Click Create SMTP credentials
- Give the IAM user a name (something like
ses-smtp-gmail) - Click Create user
- Download or copy the SMTP username and password immediately. The password won’t be visible again.
Keep these credentials somewhere safe. They’ll be needed when configuring Gmail.
Part 2: Setting up Cloudflare email routing
Cloudflare’s Email Routing is free. Completely free. It catches emails sent to a domain and forwards them wherever needed. No mailbox storage, no fancy features, just forwarding. Exactly what this setup requires.
The domain needs to be on Cloudflare for this to work. If it’s not already, you’ll need to transfer it first before continuing this guide.
Enable and set up email routing
- In the Cloudflare dashboard, select your domain
- Go to Email > Email Routing in the sidebar
- Click Get started (or Enable Email Routing if you’ve been here before)
Now we tell Cloudflare what to do with incoming emails.
- Under Routing rules, click Create address
- Enter the custom address you want to receive email at (e.g.,
hello) - Set the destination as your personal Gmail address
- Click Save
You can create multiple addresses if you want. Maybe hello@ for general enquiries, invoices@ for business stuff, whatever makes sense for you.
There’s also the catch-all option if you want every possible address on your domain to forward to Gmail. Handy, but be aware that spammers sometimes try random addresses, so you might get more junk.
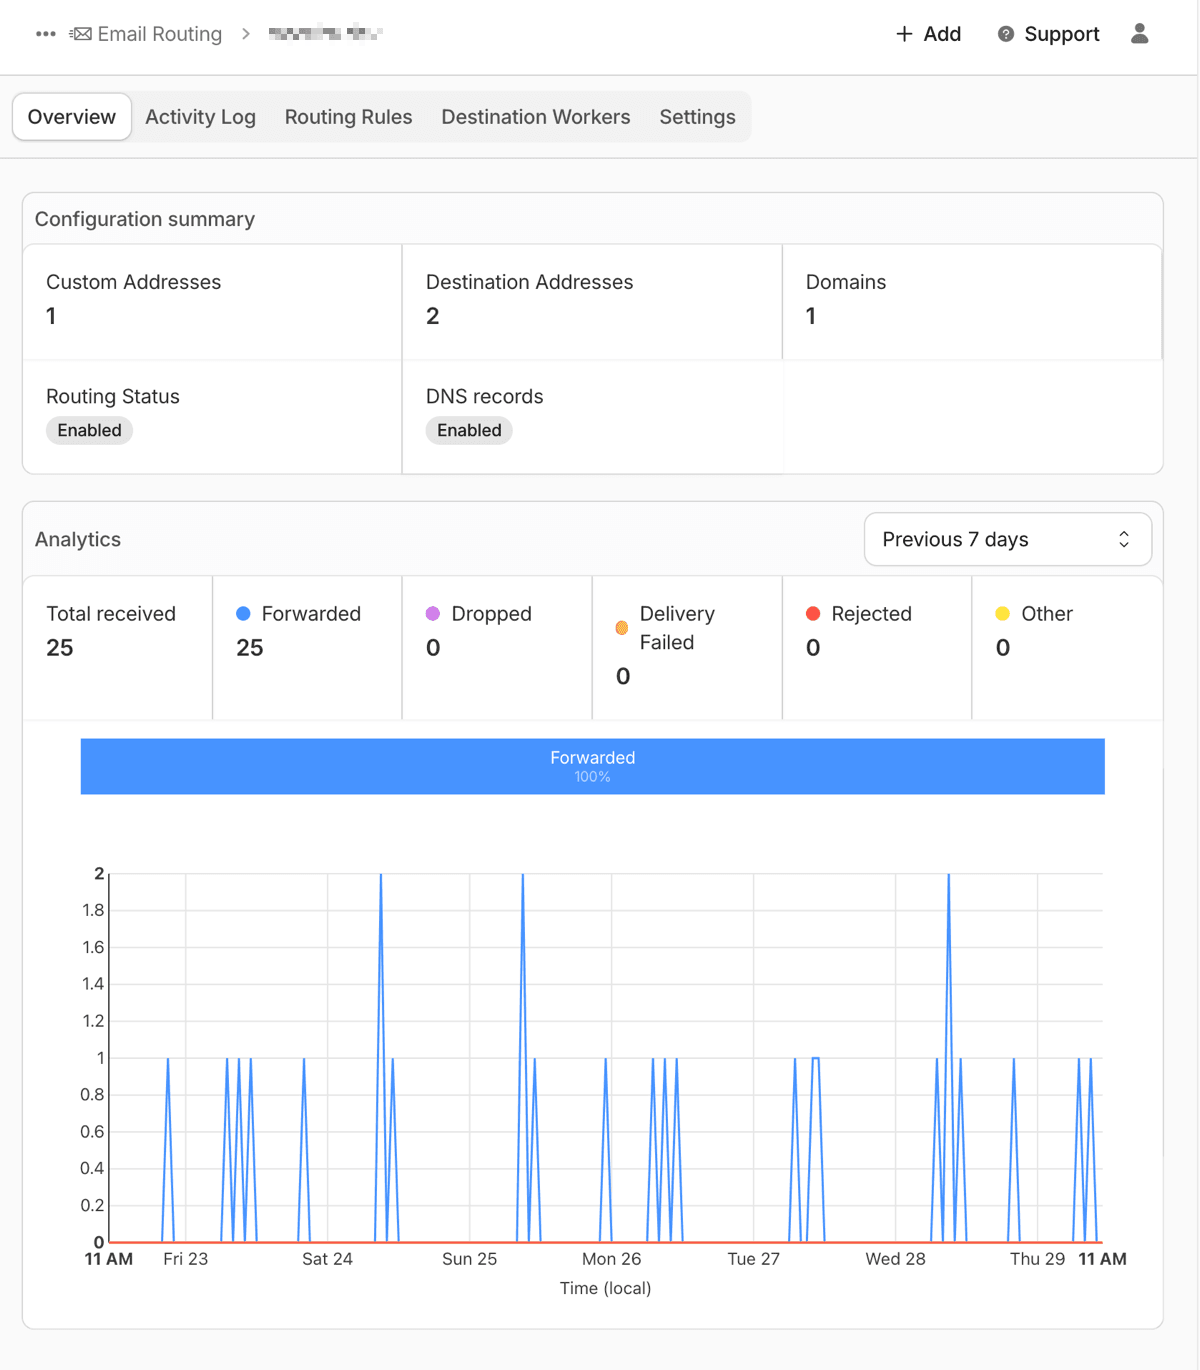
Cloudflare will automatically configure the necessary MX and TXT records. These tell other mail servers “if you want to send email to this domain, talk to Cloudflare”.

Verify your destination email
Cloudflare will send a verification email to your Gmail address. Click the link to confirm you own it. This prevents people from using Cloudflare to spam random email addresses.
That’s it for the receiving side. Emails to your custom domain will now appear in your Gmail inbox.
Part 3: Configuring Gmail to send from your custom domain
Gmail can send email through external SMTP servers, which means we can use it as a unified interface for both receiving (via Cloudflare forwarding) and sending (via AWS SES).
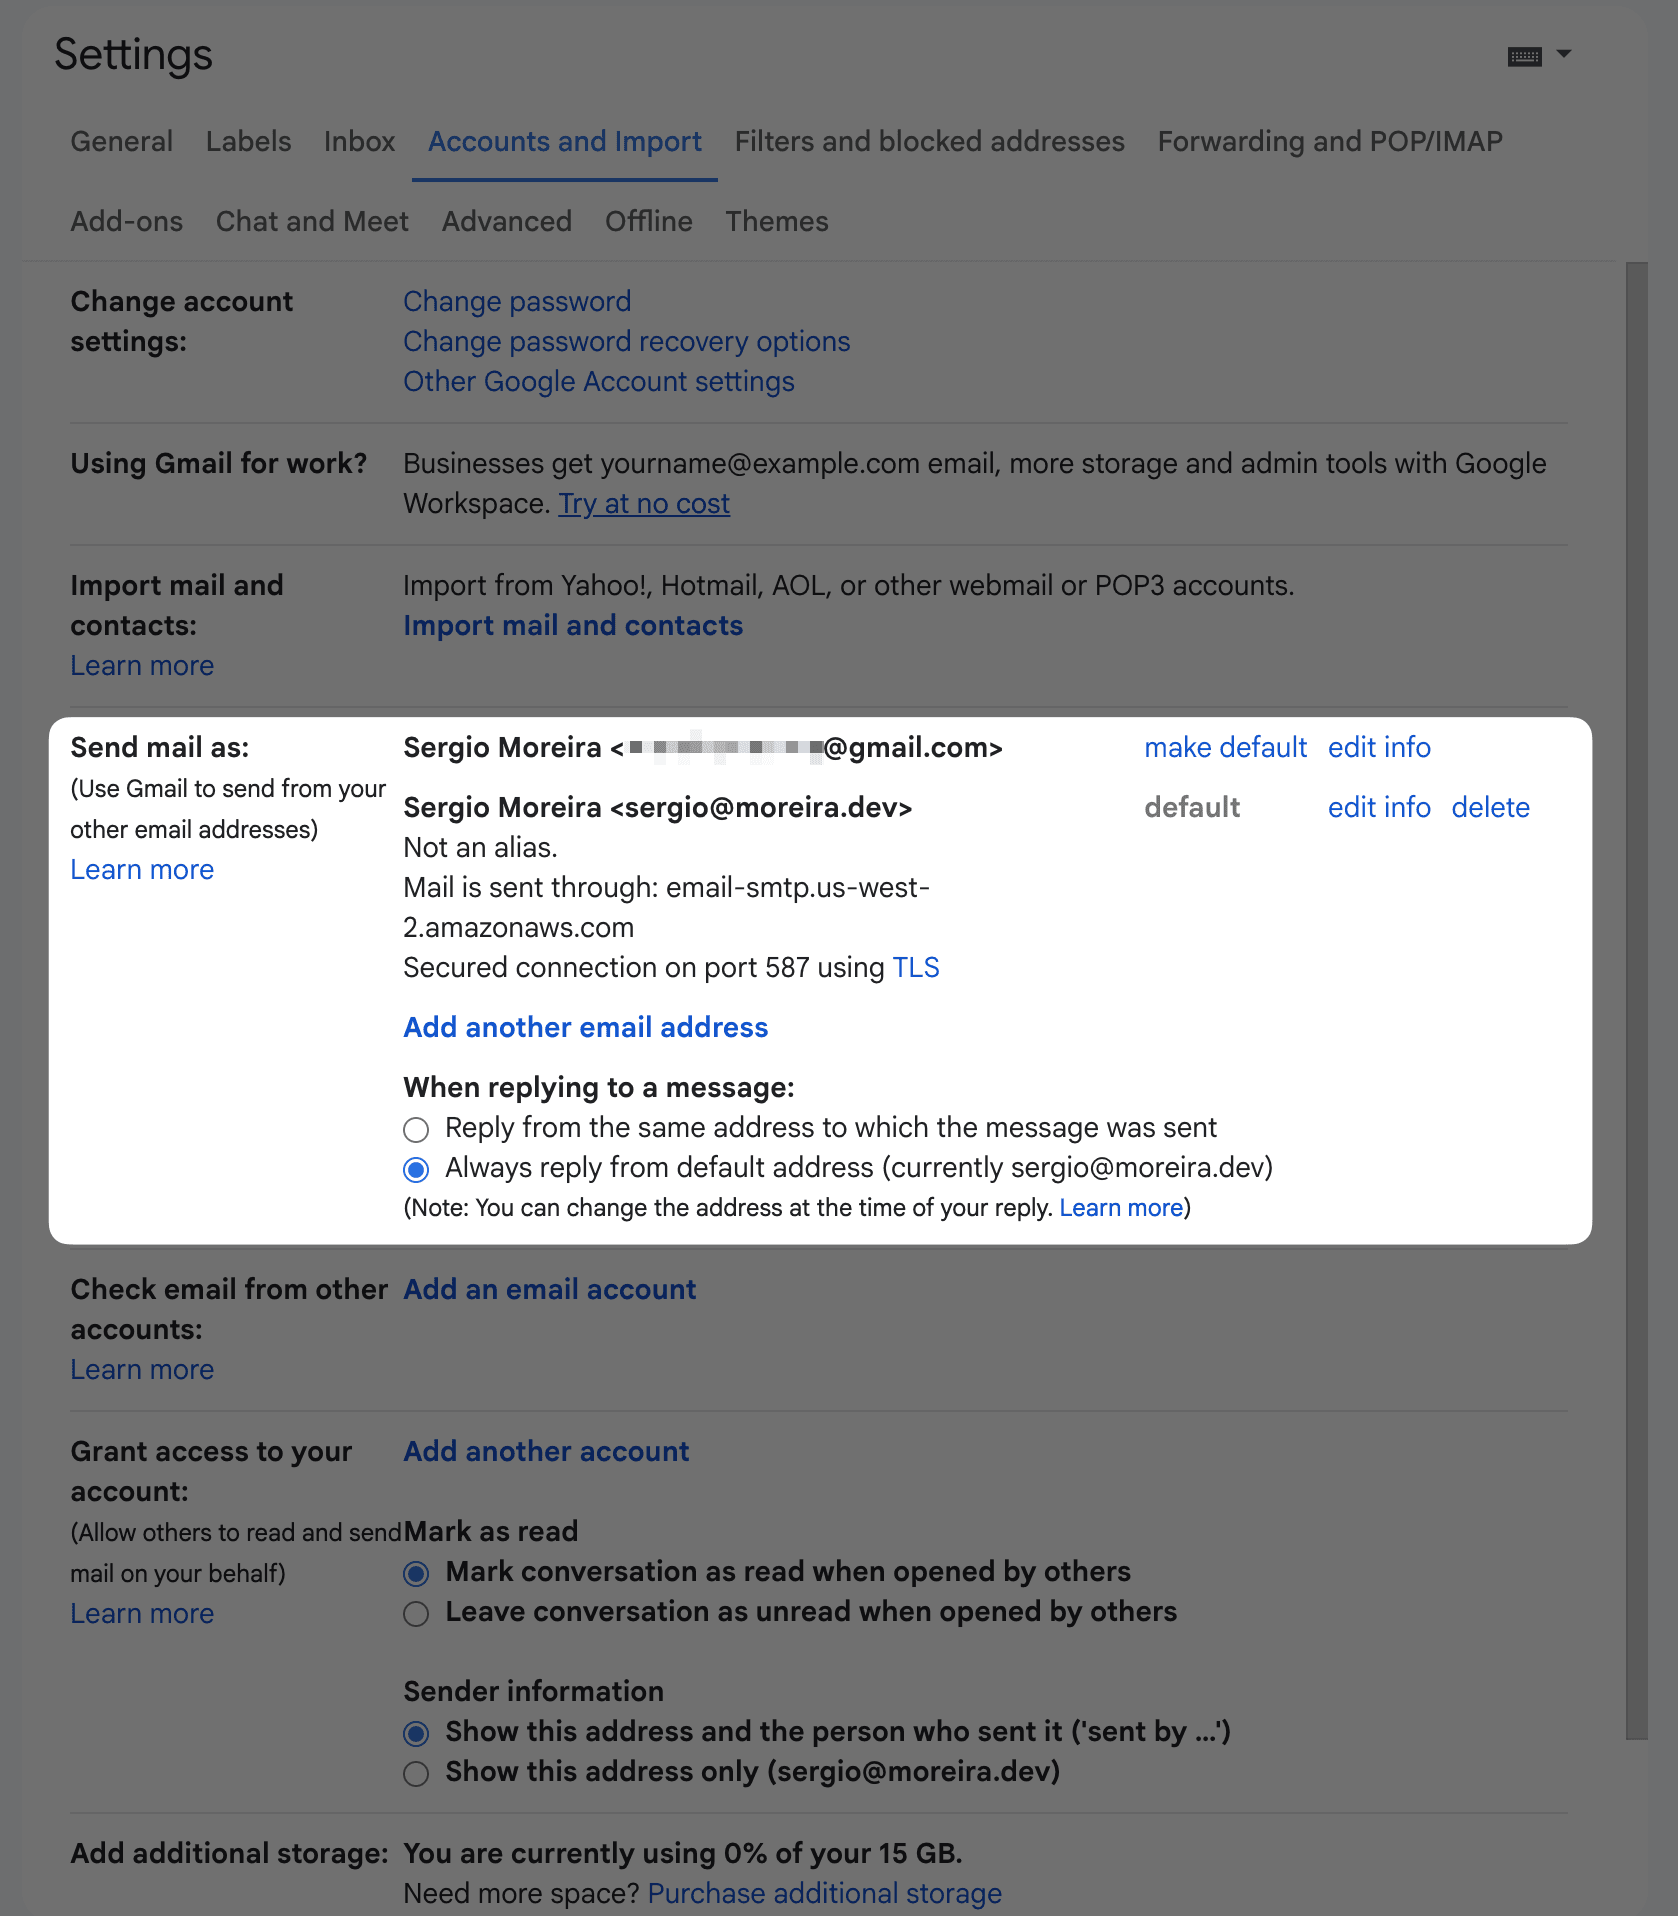
Add your custom address as an alias
- Open Gmail and click the gear icon, then See all settings
- Go to the Accounts and Import tab
- Under “Send mail as”, click Add another email address
- Enter your name and your custom email address (e.g.,
[email protected]) - Uncheck “Treat as an alias” (this is important for the reply behaviour to work correctly)
- Click Next Step
Now Gmail asks for the SMTP server details. Here’s where those SES credentials come in:
- SMTP Server: Your SES SMTP endpoint (e.g.,
email-smtp.ap-southeast-2.amazonaws.com) - Port: 587
- Username: The SMTP username from SES (starts with
AKIA...) - Password: The SMTP password from SES
- Secured connection using TLS: Selected
Click Add Account. Gmail will send a verification email to your custom address. Since Cloudflare is already forwarding that to Gmail, the verification email should arrive in your inbox within seconds. Click the link or enter the code, and you’re done.

All emails going to spam?
Gmail can be a bit aggressive with its spam filter. Don’t be surprised if it splendidly organises all inbound emails from Cloudflare straight into the spam folder.
If that happens, you can create a custom rule to trust emails coming from your custom domain:
- In Gmail, click the search bar dropdown (or press the down arrow in the search box)
- In the To field, enter your custom email address (e.g.,
[email protected]) - Click Create filter
- Check Never send it to Spam
- Optionally, check Also apply filter to matching conversations to rescue any emails already in spam
- Click Create filter
Repeat for any other custom addresses you’ve set up. This tells Gmail that emails addressed to your domain are legitimate and should go straight to your inbox.
Enjoy sending emails!
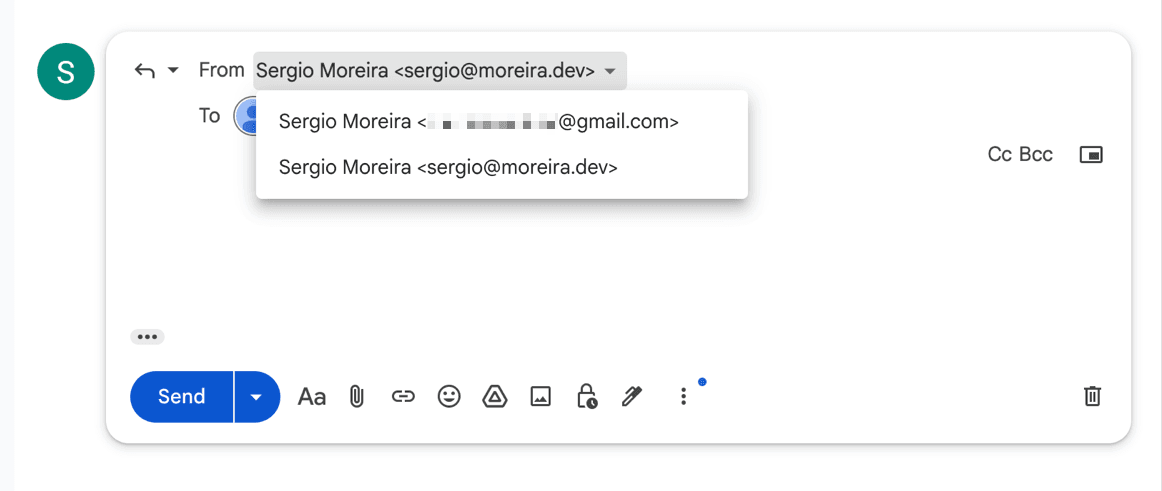
All emails sent to your custom domain will now arrive in Gmail alongside regular emails. When replying, Gmail lets you choose whether to send from the standard address or the custom domain one.
Now you can send professional emails for almost free. This is what life is all about.