
TL;DR — generated with AI
Got sick of manually compiling Rust on a production VPS every time my password manager needed an update, so I built a fully automated Kubernetes cluster that spans my home network and a cloud VPS. Everything’s managed through code (Terraform, Ansible, Packer), deploys itself via GitOps (Tekton, Harbor, FluxCD), and can recover from complete disasters in 15 minutes instead of days. The home stuff stays private behind closed doors, the public stuff runs 24/7 in the cloud, and they all talk to each other through a Tailscale mesh network pretending they’re neighbours.
Is it overkill for a homelab? Absolutely. But now I commit code and it deploys itself and my infrastructure is defined in Git so I can rebuild everything in an hour if needed. Worth every minute of the networking headaches.
I still remember the good old days when the most complex form of AI was a Tamagotchi, and deploying code to the internet meant dragging a file onto FileZilla and hoping for the best.
Not that long ago, I was still installing Rust on my production VPS to build the binary for the latest version of my favourite password manager Vaultwarden. Imagine doing that for every new version of the library, and then have a guess at how many times I did it before my brain started to feel ashamed of being part of my body: probably too many.
This project is what happens when you get tired of being afraid of your own infrastructure. It’s a fully automated Kubernetes cluster that spans my home network and a cloud VPS, connected by a secure mesh network. Everything is managed through code using Terraform, Ansible and Packer (because I swear after this, I don’t intend to manually write a single line of config if I change VPS providers or face a catastrophic disaster), deployed automatically with Tekton, Harbor and FluxCD, and designed to survive complete disasters in about 15 minutes instead of days.
Overengineered? Yes. Worth it? Absolutely. Cheap? You bet.
The problem: living in Virtualmin hell
Every overengineered solution starts with a simple problem that festers long enough to become unbearable.
My problem was a single VPS doing way too much heavy lifting. For years, I ran everything on one box using Virtualmin to manage deployments. This meant a fragile ecosystem of PHP sites, databases, Rust, and random scripts all fighting for resources on the same operating system. When you’ve manually tweaked configs, installed random packages to fix one-off errors, and have no record of what’s been installed anymore, you’ve created a dependency web that nobody can untangle.
- Manual toil: Manually configuring vhosts and wrestling with PHP version conflicts.
- Zero visibility: No performance monitoring or clear inventory of installed packages.
- Dependency hell: When everything is installed straight on bare metal, you often get conflicts between packages that require different versions of the same library.
- Manual backups: Backing up a whole VPS regularly is not an easy task. If anything happened to the VPS, I needed the exact same configuration to be able to restore it.
My biggest fear with this setup was that I had a ticking bomb where at any moment, I could lose days worth of data and days worth of work to partially restore it.
We all have enough going on in our lives fighting for attention. A homelab shouldn’t be one of those things.
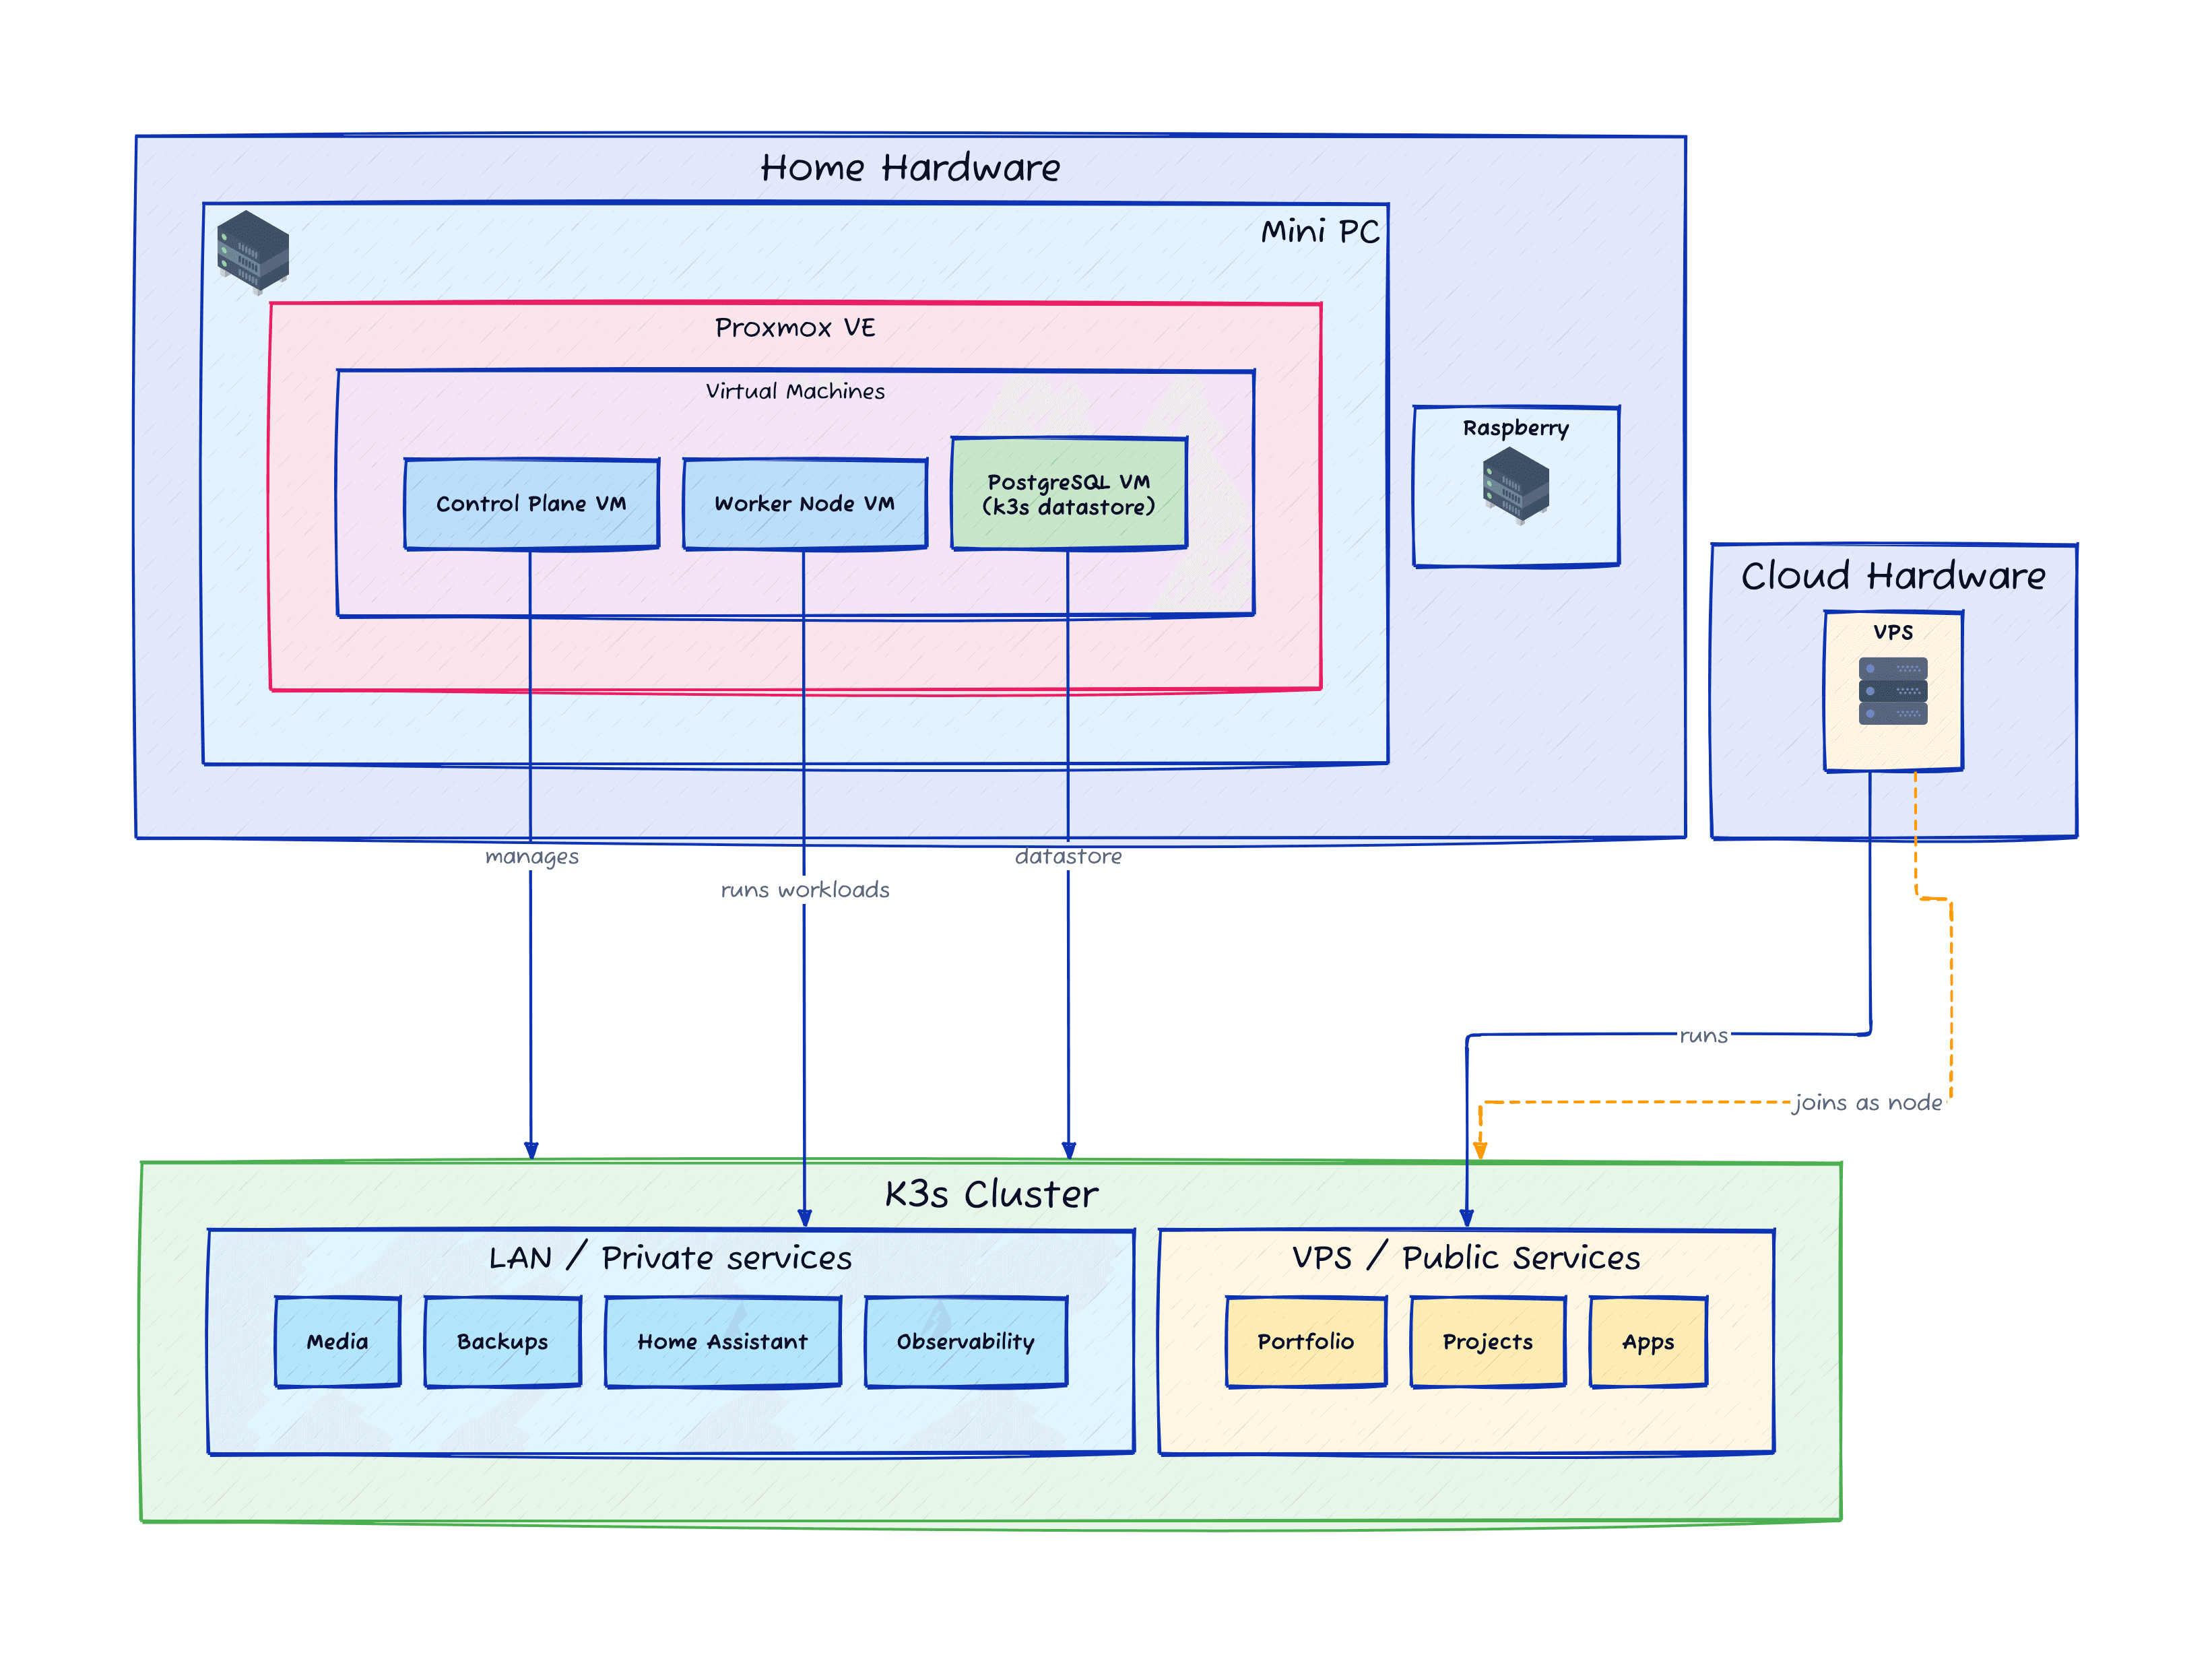
The strategy: privacy at home, 24/7 in the cloud

There are two clear types of self-hosted services: those that are non-critical and targeted at home usage, and those that are either critical or have multiple users that need to access them from anywhere.
So for example, I have two separate stacks:
- The “home” and private stack: These can’t be accessed from outside the home network. Things like Home Assistant, the core K3s services, or even a Karaoke server that my neighbours love.
- The “vps” and public stack: Anything that needs 24/7 access from anywhere in the world and by multiple people. Here I’m hosting this very website, any of my other projects, and some very handy tools like Karakeep which you didn’t know you needed until you use it.
This way, I don’t have to open my home network to the scary outside world, I can reuse my own hardware rather than paying a subscription fee for cloud computing, and I can still have a sandboxed “shed” with a door to the internet. Even if that shed is compromised, my home will have a separate set of locks where I can sleep cosy at night.
Sounds great, doesn’t it? Let’s jump into the meat.
Why Kubernetes?
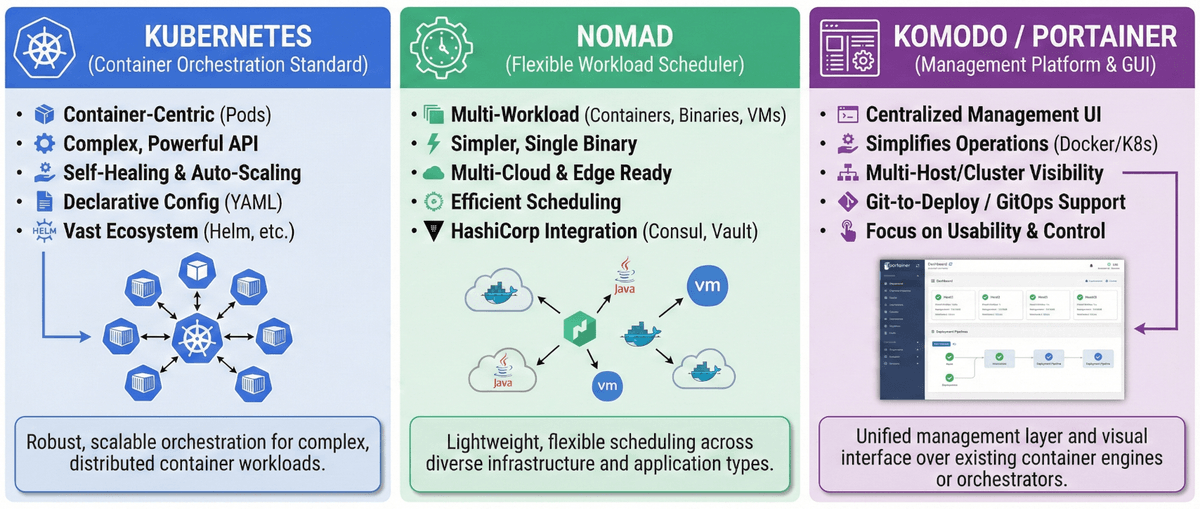
I want to be clear: to achieve the setup we just described, you don’t need Kubernetes. Unless you’re working in an enterprise environment, you probably won’t need Kubernetes in your life.
At the very least, I’d recommend anyone to use Docker or Podman along with Komodo or Portainer to bring structure and quality-of-life improvements to your servers. You can simply install them on all your servers, even make them aware of other servers you have, and manage them independently. With this setup we could call it a day a few months earlier.
Then, why Kubernetes? For me primarily it was for the sake of learning. I’ve used Docker plenty in my life to be completely comfortable with it, and I had the opportunity to poke around at HashiCorp’s Nomad for a few years to get somewhat comfortable with the concept of orchestration, so I thought I was ready to dive into Kubernetes.
There are other wonderful benefits though. With Kubernetes you can easily add more nodes (i.e. computers) to your setup, manage all the nodes from a single API, set up things like Traefik or cert-manager once per cluster, excellent secret management, fantastic backup and restore solutions, automated self-healing if a pod or a node goes down, and much, much more really.
Do we need most of those features for a homelab? Probably not. But once they’re set up and ready to use, I can’t imagine going back to not having them.
Building the foundation with infrastructure as code
To turn “Pet” servers into “Cattle,” I used the “Holy Trinity” of IaC:
Packer for the golden image
If you’re familiar with spinning up a new EC2 instance, GCP VM, or even a simple VPS, you know that you’ll get a dropdown at some point to select the OS you want to install.
Packer is the tool that allows us to create our own OS images, preconfigured and “cloud ready” (have a look at cloud-init for more info).
I configured Packer to talk to the Proxmox API, spin up a temporary VM to load a standard OS image, inject a preseed configuration, and install the QEMU guest agent and cloud-init, so I never have to manually install an OS again.
I actually open-sourced the Packer template I used for this project, feel free to use it or make it better:
Terraform as the architect
If you’re familiar with React, you know how to define in your code the state of what you want to get, and let the framework take care of the magic.
Terraform is exactly that, but for infrastructure. You want 2 new EC2 instances in your AWS account? You can define them in a YAML file and let Terraform do the rest. Same for Proxmox or many other providers.
In my setup, Terraform connects to Proxmox, creates a control-plane and n number of worker nodes, plus a DB VM for K3s to use. All of those, installed with the Packer image we previously created.
Ansible to configure the VMs
Terraform creates the VMs completely empty with a brand new OS. Now we need to install the software we want to run on them.
Ansible is like having a robot version of yourself that will execute those apt-get update && apt-get install commands for you in the order that you need them, so that you don’t have to do it and more importantly, you don’t have to ever remember them.
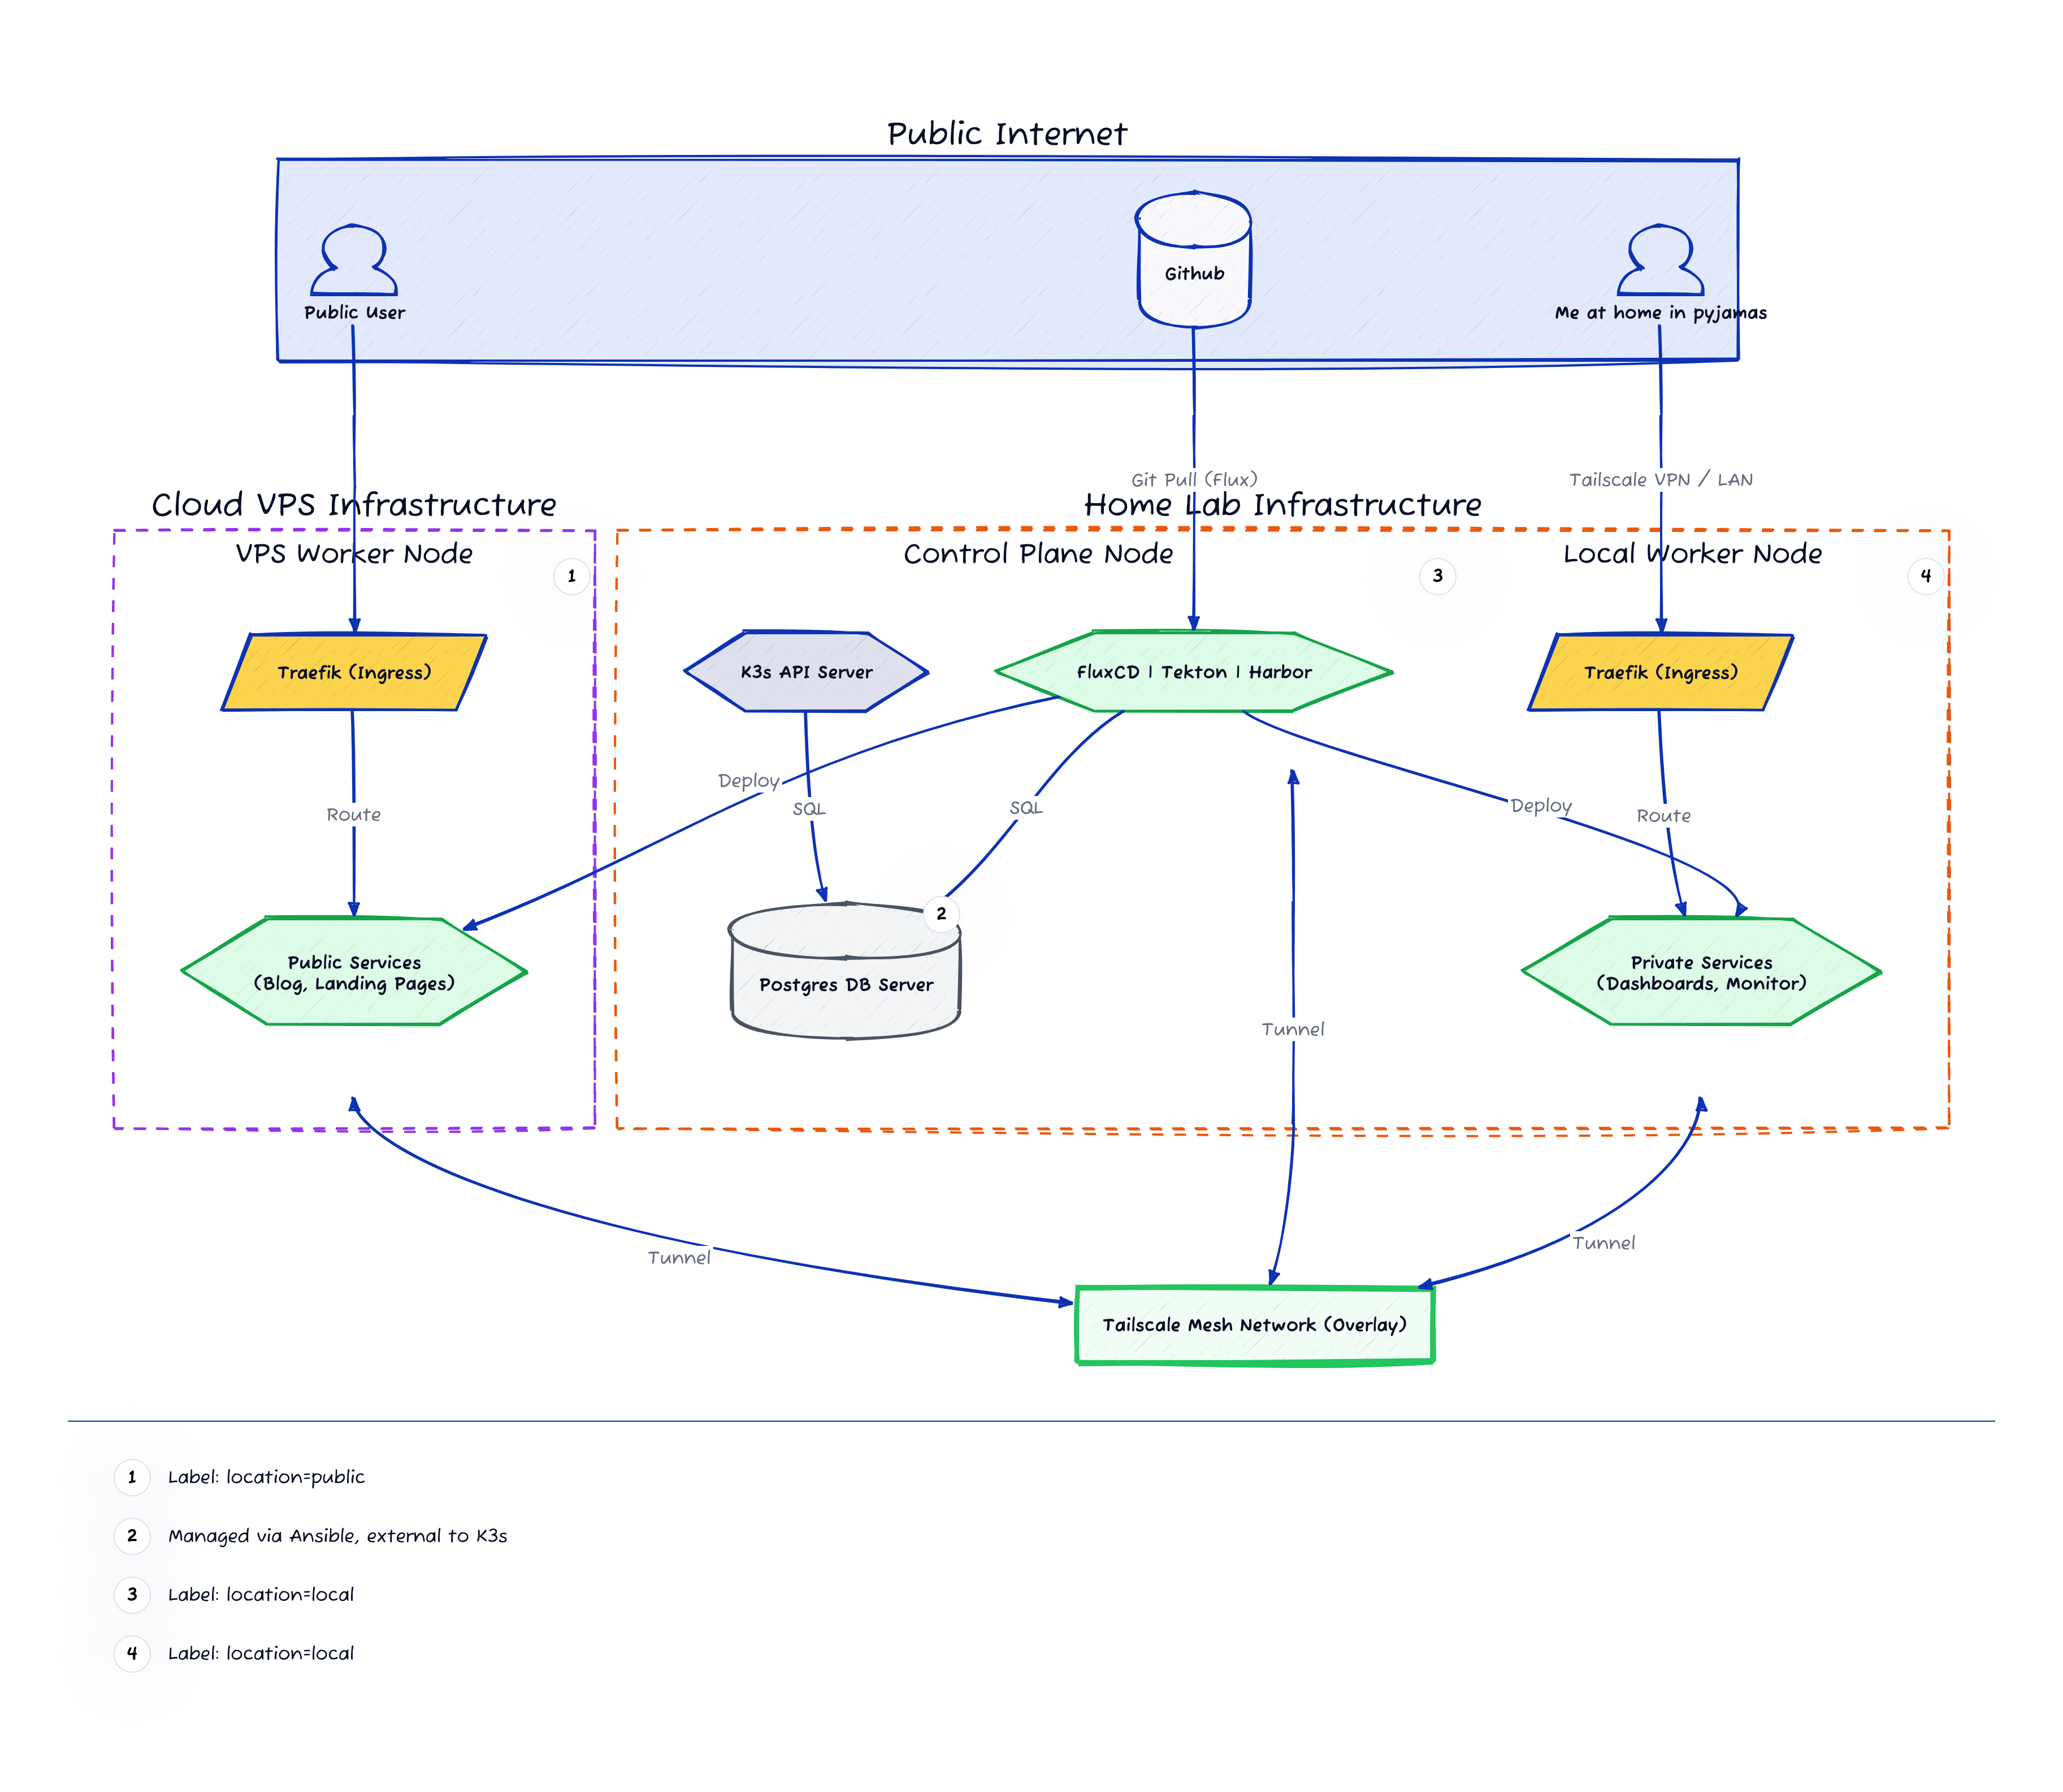
In my setup, Ansible handles the OS hardening and K3s bootstrapping. It dynamically detects if a node is at “home” or in a “vps” and configures K3s accordingly.
Networking fun
Easily one of the biggest time sinks in this project was figuring out how to connect my home network to the cloud VPS so that we have a single cluster for simplicity, that can have multiple nodes either at home or in the cloud.

I have to admit, the network setup that I chose is bending the Kubernetes rules a bit. When latency between nodes is extremely high, we should probably be looking at having them as separate clusters rather than nodes. My setup is making horizontal scaling impractical to use at the moment.
Since this is a homelab with limited resources and I’m not yet lucky enough to have to worry about scaling, I’m happy to cross that bridge when I come to it.
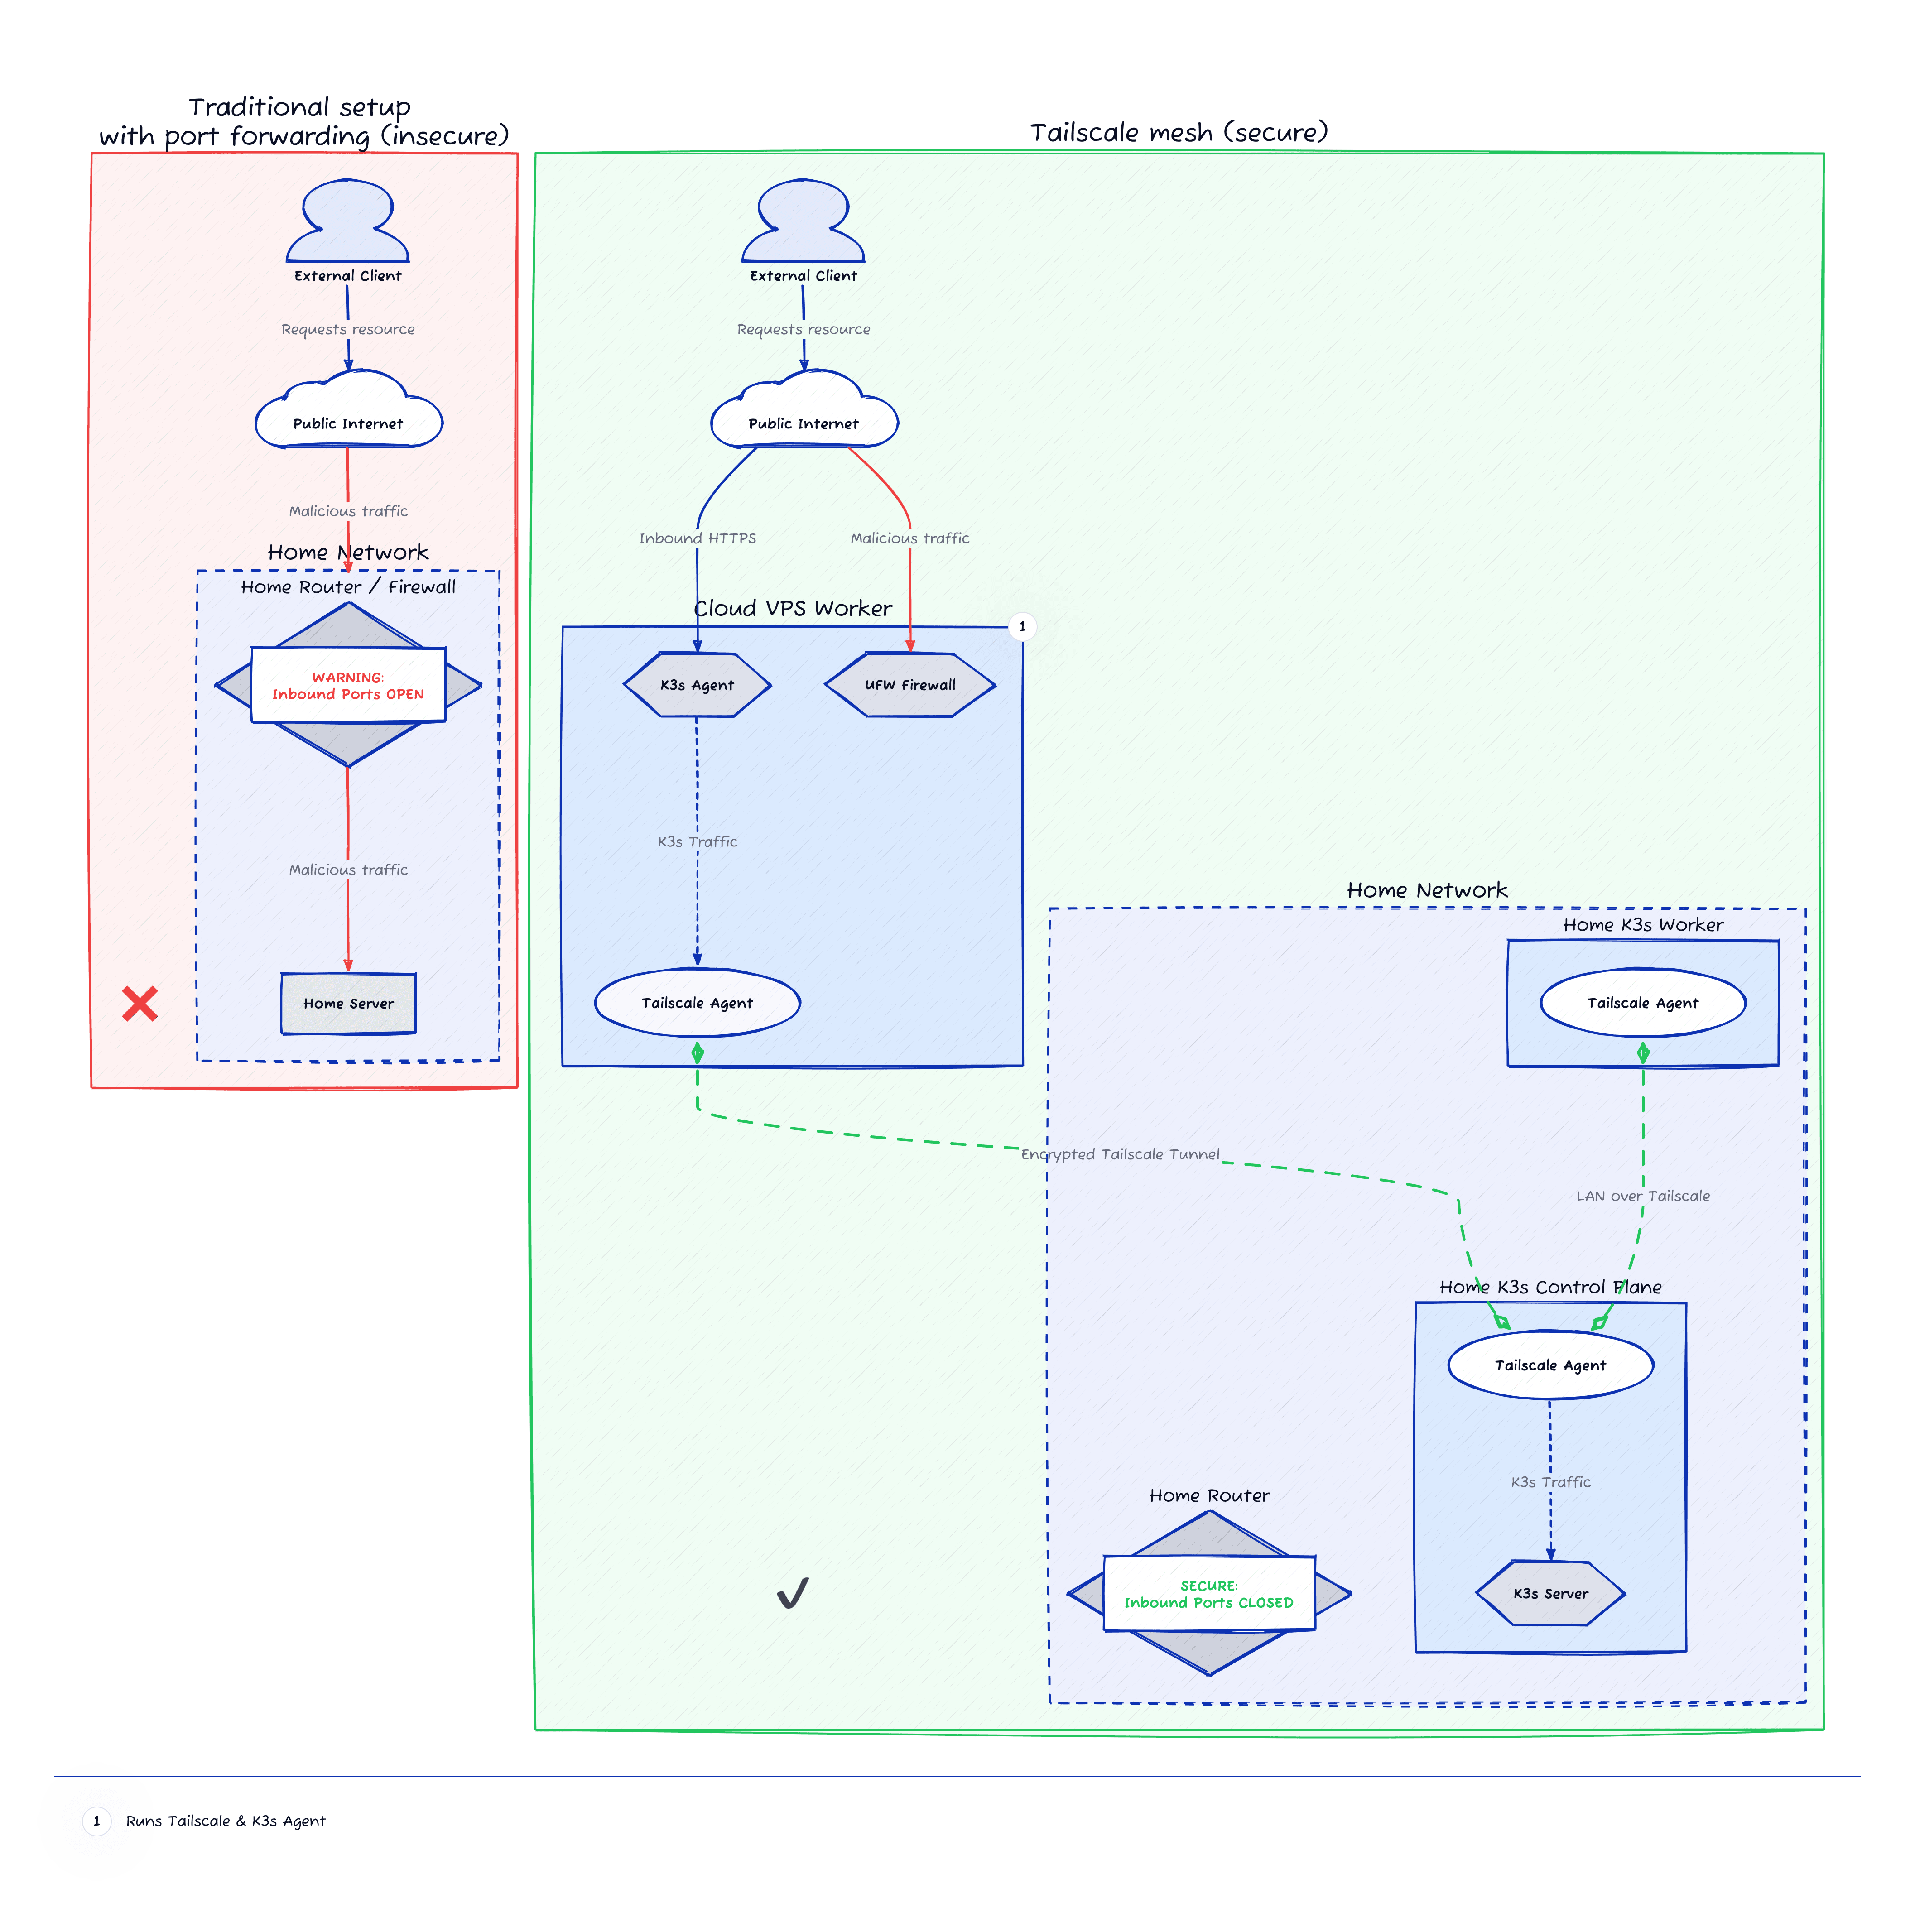
Tailscale to the rescue
To help us treat the home network and the remote VPS as a single flat network we have to effectively create a VPN where all nodes can live in harmony thinking that they are in fact close to each other (sorry I had to lie to you guys).
For that purpose, we could use plain WireGuard to manually stitch the network together, or in my case, we can delegate the complexity to a service like Tailscale or Headscale.
Since Tailscale is the simplest solution to configure, works excellently with Kubernetes, has heaps of extra features, and at the time of writing it’s free for very reasonable usage, I decided to give it a go.
Long story short for K3s, we need to move flannel to live in the Tailscale network without any awareness of the outside world.
So the way that it works for me is by configuring the K3s control plane with:
INSTALL_K3S_EXEC="--node-external-ip={{ k3s_cp_tailscale_ip }} --node-ip={{ k3s_cp_tailscale_ip }} --flannel-iface=tailscale0 --kubelet-arg=address={{ k3s_cp_tailscale_ip }} --egress-selector-mode=disabled"Setting egress-selector-mode=disabled was necessary as it will cause the nodes to completely lose connectivity between them after the Tailscale network undergoes a planned or unplanned outage. It also simplifies the network configuration as in our case all of the nodes have full, routable connectivity to each other and to pod networks via Tailscale.
And the worker nodes:
INSTALL_K3S_EXEC="--node-external-ip={{ k3s_node_tailscale_ip }} --node-ip={{ k3s_node_tailscale_ip }} --flannel-iface=tailscale0 --kubelet-arg=address={{ k3s_node_tailscale_ip }}"So with the network up and running, we can now tag our nodes as either “home” or “vps” and set Kubernetes affinities to deployments so that they’re only scheduled on the right nodes.
Networking outages
But what happens if Tailscale goes down? Or if our home broadband is unavailable? Or if the VPS provider goes through maintenance?
Ideally we want to allow each of the nodes in the cluster to still continue to serve the services they’re hosting regardless of connectivity to other nodes, but this is not how K3s comes configured out of the box.
To solve this in my case, I removed ServiceLB from the equation (the default load balancer from K3s) and made sure all nodes have an instance of CoreDNS to be able to resolve DNS queries, and an instance of Traefik configured to serve requests from its own node only.
The limitation with removing ServiceLB is that we’re losing horizontal scaling across nodes, and with our Traefik setup we have to force the services to always be deployed on the same node, losing some benefits of having a Kubernetes cluster.
But hey it works. This website will always be served from the VPS regardless of my home network being up or down, or the Tailscale network being available or not.
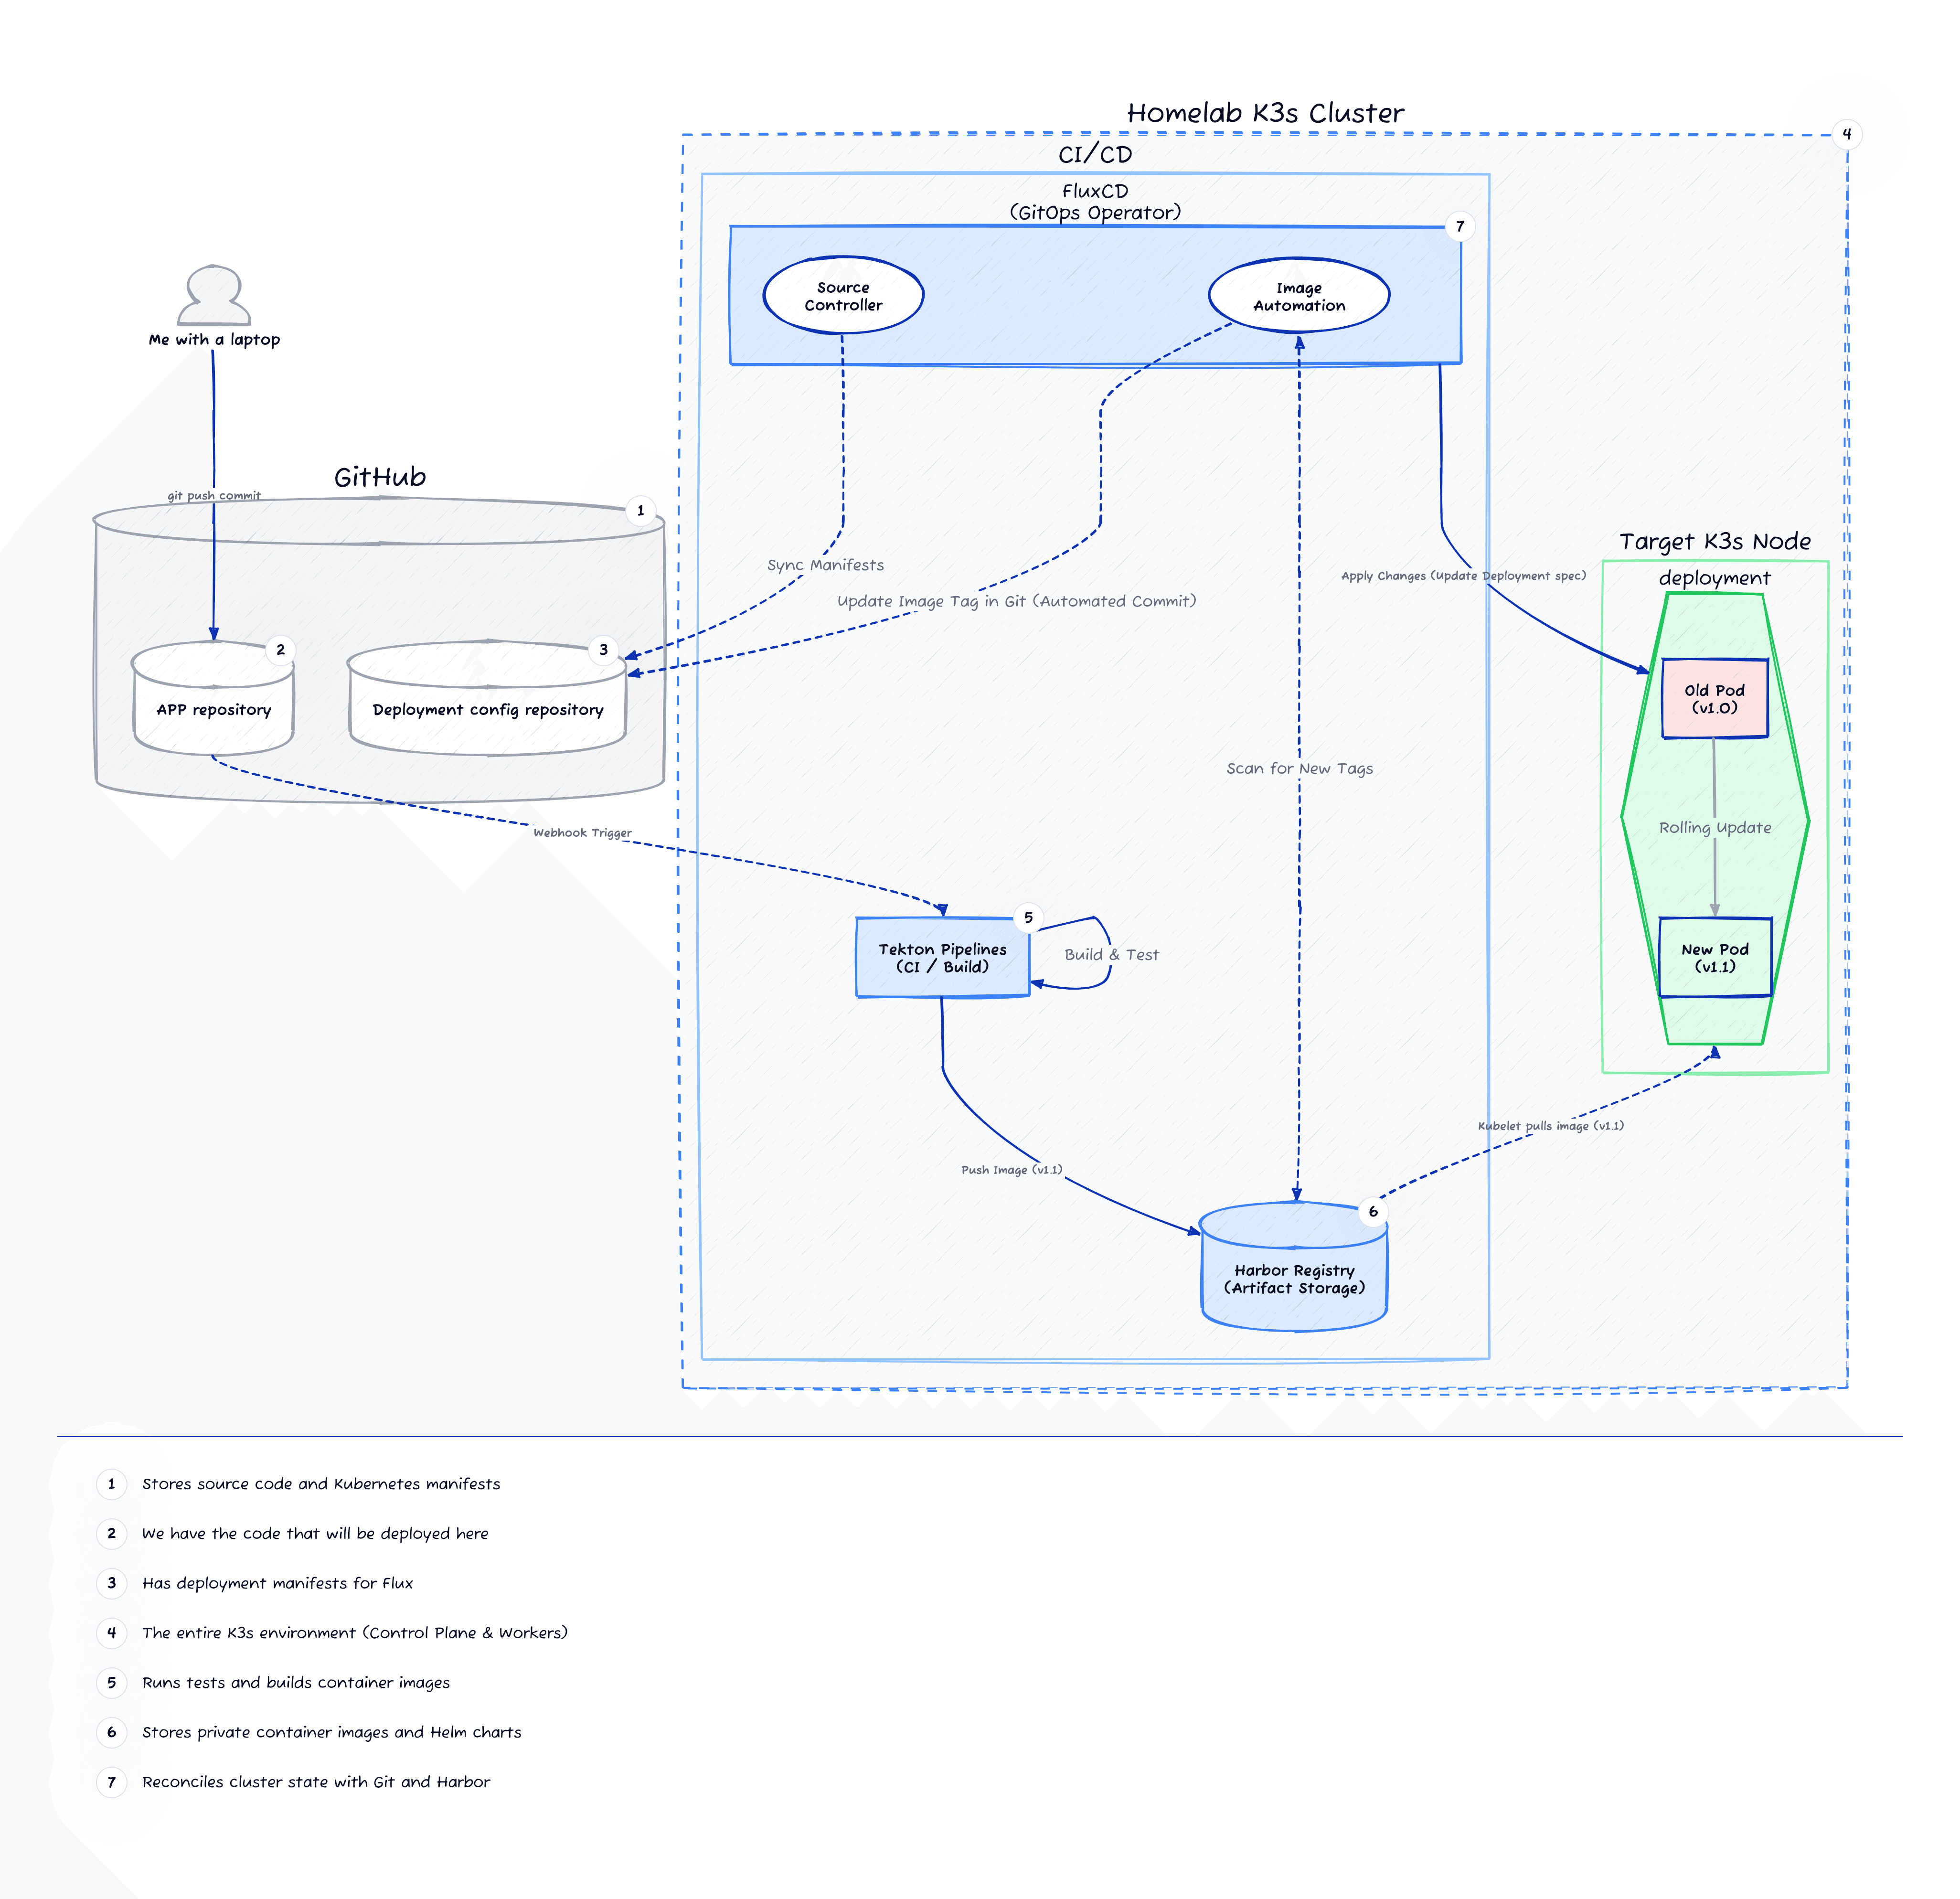
The “automagical” workflow
Now let’s collect the fruits of our overengineered Kubernetes environment. You can set the deployment pipeline any way you want, but what I chose is a GitOps approach where:
- There is a trigger: Committing code to GitHub, for example with a new change on this website.
- The CI (Tekton): A GitHub webhook tells Tekton that there’s a new commit, so Tekton goes off and builds and tests the new image.
- The Artifact (Kaniko): If tests pass, Kaniko builds a Docker image and pushes it to my internal Harbor registry.
- The Deployment (FluxCD): Flux monitors Harbor, detects the new image, updates the infrastructure Git repo, and synchronises the cluster state (meaning a new pod gets born and deployed to production or staging).
Isn’t it wonderful? All I did was commit a change, and after a few minutes, that change is now live on the internet.

So, what are the highlights of the hard work?
A.K.A. remind me again why I went through all this trouble.
- Immutable infrastructure: The infrastructure is fully defined and safely stored with version-control. I can change VPS providers in less than an hour, or replicate my Proxmox setup if my mini-PC dies at any time.
- Deployments are fun: Why? Because I don’t have to do anything extra. I commit code and it gets deployed. Easy peasy.
- Private and secure: I really can sleep at night knowing that no-one on the internet can hack my local Karaoke server (or my Vault for that matter). Imagine if one day I wake up to thousands of Reggaeton songs playing in karaoke mode.
- Scalability: I did mention that with the current setup we’re losing horizontal scaling, but that’s not completely true. I can still add more nodes to the cluster in no time. Replication is a different beast.
To translate that in time terms:
| Old Mate VPS | Kubernetes | |
|---|---|---|
| New Deployments | Hours of config | 10 Minutes |
| Updates | 30m “babysitting” | 0m (Automated) |
| Disaster Recovery | 2 Days | 30 Minutes |
What’s next?
For this project I don’t have any regrets with the tech choices I made or the process I followed, it was a great learning experience. I see heaps of opportunity for future improvement though:
- Secrets management in Ansible: I admit, I’m still figuring out my golden workflow for this.
- High availability: This is simply not possible at the moment. If the VPS goes down, the website goes down for as long as it takes for the VPS to come back up. I want to make HA possible in the future.
- Horizontal scaling: It’s less important for me than HA, but I’d love to be able to scale my deployments up and down automatically as needed at some point.
- Observability and backups: This is my next priority. All of the pieces are in place, now it’s time to get my dashboards together and unleash Longhorn.